|
||||||||||||||
|
||||||||||||||
| Siteownersdesign.com |
||
| Flash Basics - Layers | ||

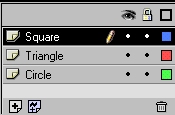
Layers are simple transparent sheets that are placed one on top of each other. These layers can be moved around, added and they can also be deleted. They organize your movie and all you to affect objects without affecting the rest of your movie. When editing object on a layer, the layer selected will be the only layer that is being modified. To activate another layer, you must click on it to select it. While it is selected, the layer will be highlighted until you deselect it. To let you know if a layer is active, you will notice a small pencil beside the layer name.
The image above is what layers look like. You see here that there are three layers, and layer "one" is selected. Creating
and modifying layers:
Now,
in the Square layer, draw a small square image located
at the far left of your stage. Now select the Triangle
layer, and draw a triangle in the middle of your stage,
but make sure that you fill in the triangle, and you
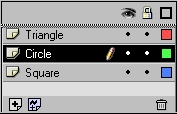
can use the You can set the order of your layers, to minimize the appearance of some objects, or just to be more organized. To set the order, you simply click and drag the layer up or down to the position you want.
Set the order of your layers to Circle, Triangle and then Square. You now see how easy it is to create, rename and move layers. Locking
and Hiding layers: This concludes the Layers section, please proceed to the Type and Text section
Permission to reprint this tutorial in its entirety is granted only if all information below this notice, including the link, is included as it is written. Brought to you by: Siteowners Ltd.- SiteownersDesign.com is part of Siteowners.com network and offers professional web design services and tutorials. |
||

|
| Delivering State-of-the-Art On Demand eCommerce Software |
| COMPANY | SITEMAP | CONTACT US |
| © Copyright 2004 Siteowners.com • All rights reserved • Various trademarks held by their respective owners. |