 |
Siteownersdesign.com  Tutorials Tutorials  DreamweaverMX Tutorials DreamweaverMX Tutorials  Dreamweaver Interface Dreamweaver Interface |
 |
 |
| Dreamweaver Interface |
 |
| In this section you will learn about the interface of Dreamweaver. You will also learn about the various panels and properties of Dreamweaver. |
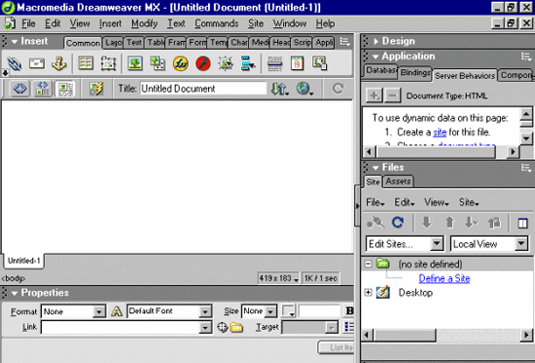
| The Macromedia Dreamweaver MX has two work layouts: one is all in one layout the other is floating layout where you can collapse the panels that are by default open when you install the software. After opening the Flash application numerous panels and windows will open. The Dreamweaver user interface consists of main menu, insert menu, document menu and work area, along with all the properties inspector, panels and windows you view on opening the application. The following components make up the user interface in Flash: |
| 1. |
Bars |
|
|
|
a. |
Main Menu Bar |
|
|
b. |
Insert Bar |
|
|
c. |
Document Bar |
|
| 2. |
Panels |
|
|
|
a. |
Design |
|
|
b. |
Application |
|
|
c. |
Files |
|
|
d. |
Answers |
|
| 3. |
Properties Inspector |
|
|
| The figure below shows the Dreamweaver Interface. |
|
| |
| Menu Bars |
| When you open the Dreamweaver application there are numerous panels and windows that open. Main Menu bar allows you to create and access numerous global functions, tools and commands that make the application user-friendly. The menu bar of Dreamweaver is same as other Macromedia products such as Flash, Fireworks, Authorware, and Director. |

|
| The table below shows the main menu options. |
|
| Table lists the function and uses of the tools on the Main Menu Bar. |
|
Menus |
Functions |
| 1. |
File |
File menu is a global menu through which you can create, open, save and preview your web page or website. |
| 2. |
Edit |
The selection and searching can be done using the Edit menu. |
| 3. |
View |
You can view different views of your document, various page elements and tools that are used by Dreamweaver MX. |
| 4. |
Insert |
The Insert menu provides methods to insert objects in your document. |
| 5. |
Modify |
You can change the settings of the page using the Modify menu. |
| 6. |
Text |
To manipulate text attributes and alignment, Text menu is used. |
| 7. |
Commands |
The Commend menu provides various commands such as: you can create web photo album, Clean Up HTML, Drop Down Menu Builder for IE and so on. |
| 8. |
Site |
The websites can be created, opened, and edited using the Site menu option. You can also manage the current site. |
| 9. |
Window |
You can access all the panels, inspectors, styles and so on using the Window menu. |
| 10. |
Help |
The Help menu provides the various help topics such as help on What’s New, Dreamweaver, Extension, Support Centre, Registration and so on. |
|
|
| Insert Bar |
To create a website or a page the Insert bar allows you to insert various images, tables, layers in your current document. You can create and insert objects using the features defined below that are in the form of buttons.
To open the Insert bar perform the following steps: |
1. Click the View menu in the menu bar, a sub menu drops down.
2. Click the Toolbar option a further submenu drops down.
3. Choose and Click Document option.
4. The Document bar is opened. |
TOP |
| Table lists the function and uses of the tools on the Insert Bar. |
| 1. |
Common |
The Common tab in the Insert bar allows you to create most commonly used objects in a website. These are: Hyperlink, email Link, Named Anchor, Insert Table, Draw Layer, Image, Image Placeholder, Fireworks HTML, Flash Rollover Image, Navigation Bar, Horizontal Rule, Date, Tabular Data, Comment and Tag Chooser.

|
|
|
|
| 2. |
Layout |
Using the Layout Tab you can view the tables in Standard or Layout view mode. It has the following features: Insert Table, Draw Table, Standard View, Layout View, Draw Layout Table and Draw Layout Cell.

|
|
|
|
| 3. |
Text |
The Text and Paragraph formatting text can be inserted using the Text tab in the Insert bar that has the following features: Font Tag Editor, Bold, Italic, Strong, Emphasis, Paragraph, Block Quote, Preformatted Text, Heading 1, Heading 2, Heading 3, Unordered List, Ordered List, List Item, Definition List, Definition Term, Definition Description, Abbreviation and Acronym.

|
|
|
|
| 4. |
Tables |
The table related tags can be inserted in a page using the Table tag that has the following features: Insert Table, Table Tag, Table Row, Table header, Table Data and Table Caption.

|
|
|
|
| 5. |
Frames |
To create common frame layout Frame tab is used that has the following features: Left Frame, Right Frame, Top Frame, Bottom Frame, Bottom and Nested Left Frame, Bottom and Nested Right Frame, Left and Nested Bottom Frame, Right and Nested Bottom Frame, Top and Bottom frames, Left and Nested Top Frames, Right and Nested Top Frames, Top and Nested Left Frames, Top and Nested Right Frames, Frameset, Frame, Floating Frame and No Frame.

|
|
|
|
| 6. |
Forms |
To create form and insert form elements, Form tab is used that has the following features: Form, Text Field, Hidden Field, Text Area, Check Box, Radio Button, Radio Group, List/Menu, Jump Menu, Image Field, File Filed, Button, Label and Field Text.

|
|
|
|
| 7. |
Templates |
You can save the current document as a template file and you can also insert various regions in a current document. The Templates has the following features: Make Template, Make Nested Template, Editable Region, Optional Region, Repeating Region, Editable Optional Region and Repeating Table.

|
|
|
|
| 8. |
Characters |
You can insert the special characters by choosing Character tab in the Insert bar that has the following features: Line Break, Non-Breaking Space, Left Quote, Right Quote, Em Dash, Pound, Euro, Yen Copyright, Registered Trademark, Trademark and Other Characters.

|
|
|
|
| 9. |
Media |
You can insert plug-ins and applets in the Media tab that has the following features: Flash, Flash Button, Flash Text, Shockwave, Applet, Param, ActiveX and Plugin.

|
|
|
|
| 10. |
Head |
You can add elements in the HEAD Section of your document by using the Head Tag in the Insert Menu that has the following features: Meta, Keywords, Description, Refresh, Base and Link.

|
|
|
|
| 11. |
Script |
You can insert scripts such as Java Script and VB Script. You can also insert the server site scripts using the Script tag in the Insert Menu that has the following features: Script, Noscript and Server-Side Include.

|
|
|
|
| 12. |
Application |
You can add Server Behavior to a page using the Application tab that has the following features: Recordset, Repeated Region, Dynamic Table, Dynamic Text, Recordset Navigation Bar, Recordset Navigation Status, Master Detail Page Set, Record Information form and Record Update Form.

|
|
|
Note
The shortcut to open Insert panel is Ctrl + F2 and to open properties Ctrl + F3 |
TOP |
| Document Bar |
You can use the Document bar to add page title in the current document. You can also adjust variety of settings that are required by you, such as you want to view the page in a Design, Code or Code and Design view mode, Preview in Browser, Refresh your page and so on. If you want to further change your page settings you can do that by changing the page properties and properties panel that will be discussed later in this chapter.
To open the Document bar perform the following steps: |
1. Click the View menu in the menu bar, a sub menu drops down.
2. Click the Toolbar option a further submenu drops down.
3. Choose and Click Document option.
4. The Document bar is opened. |
|
TOP |
| Panel Groups |
Panels are important while working in Flash MX interface. They allow you to access all the tools that help in modifying an object. For example, changing alignment, color, size, and more. You can control colors, alignment, positions, font face, and font size by using the panels in Flash. The following panels are available in Flash:
· Design
· Applications
· Files
· Answers
The Panels can be collapsed and expanded easily. There are two methods by which you can Expand and Collapse the Panels. |
| Method 1: |
To expand and collapse the panels perform the following steps:
1. On opening the Dreamweaver application by default you will see Design, Applications, Files and Answers Panel are open.
2. On the top right side of each Panel there is a button.
3. On right clicking the button you will see the option Maximise Panel.
4. Click on the Maximize Panel option and the panel is expanded.
5. Similarly, to close the Panel there is an option in the list called Close Panel.
6. On clicking this option the Panel will be closed. |
|
| Method 2: |
1. To expand and collapse the panels by the second method perform the following steps:
2. Click on the Window Menu Bar.
3. When the Menu Bar is displayed, click the panel that you want to open.
4. In order to Expand and Collapse the Panels you can use the same procedure as mentioned in Method 1. |
TOP |
| Design |
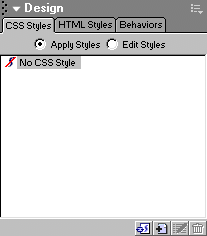
Using the Dreamweaver application you can incorporate other styles and languages to add interactivity to the page designed by you. The Design panel has three options: CSS Styles, HTML Styles and Behaviors. The Design panel is shown in the figure below:
· CSS Styles: You can add interactivity to a page using the CSS styles in your current document. You can create, edit and apply a new style using the CSS Style panel.
· HTML Styles: Using the HTML Styles panel you can view the HTML styles that are available in the current document. You can view two types of HTML Styles: Paragraph Styles and Selection Styles.
o Paragraph Styles allows you to format paragraph.
o Selection Styles allows you to format the selected text in a document.
Behaviors: You can attach and edit behavior to a page using the Behavior Panel. |
 |
TOP |
| Applications |
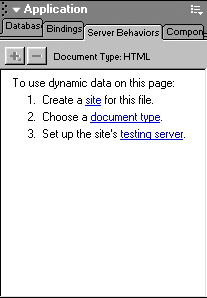
When you are working with Dreamweaver Interface in your current document, you can also work with other applications, such as:
· Databases: The Database panel is used to create Database connections, add database related codes, and keep track of the database used in your current document.
· Bindings: Using Binding panel, you can define sources of dynamic content for the current document, and also you can add content to the page.
· Server Behaviors: You can add, edit and create Server Behaviors in your current document.
Components: You can create, inspect and insert component code in your current document using the Components panel. |
| The figure below shows the Application panel. |
 |
TOP |
| Files |
| The File Panel has two options Site and Assets as shown in the figure below: |
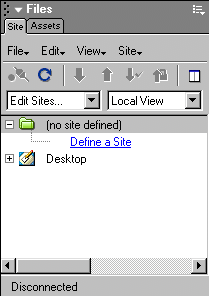 |
· Site: The Files Panel shows complete site map of your current site in hierarchal form. You can view the local, remote, and testing server files using the Site Panel. By default you can view the local site.
· Assets: The Assets display all the items that you have used in the current site’s library. It is the Library of your current site. |
TOP |
| Answers |
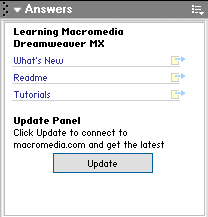
| When you are working on Dreamweaver and you want to quickly access some information, for that Answers Panel is used that covers all the tutorials, TechNotes, Dreamweaver extensions, and more. |
 |
| Properties Panel |
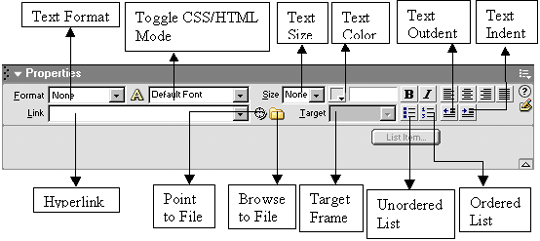
You can change the the properties of an object or text using the properties panel. The figure properties panel is shown below.
To open the Document bar perform the following steps:
1. Click the View menu in the menu bar, a sub menu drops down.
2. Click the Toolbar option a further submenu drops down.
3. Choose and Click Document option.
4. The Document bar is opened. |
|
| You can set or change the properties of current text or an object using the Properties box. You can change the color of the text, background color, add a hyperlink, align objects and so on using the Properties panel. |
< Back Installing Dreamweaver - Working with common elements Next >
|
 |
 |
 |
|
WORDTRACKER
Target the wrong keywords
and all your SEO efforts
will be in vain...
|


